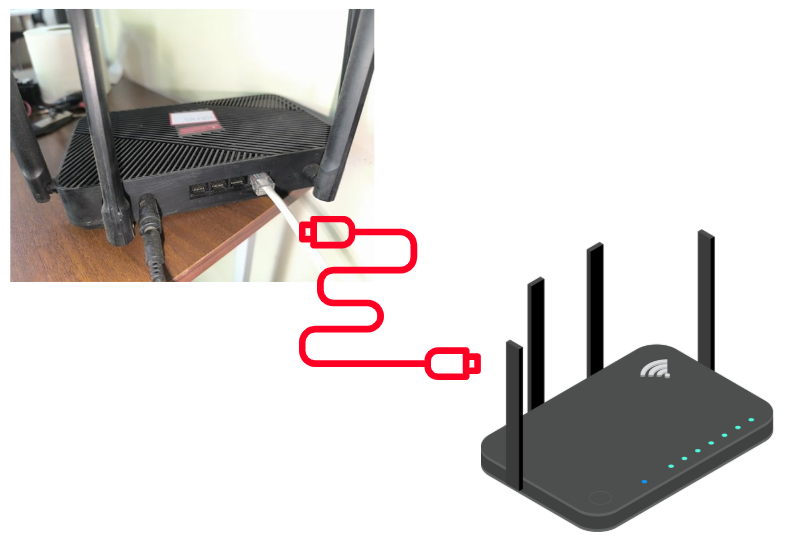
1. Connect the LAN cable from the WAN port of the ShareWiFi router to a LAN port on your ISP modem/router or main internet router.
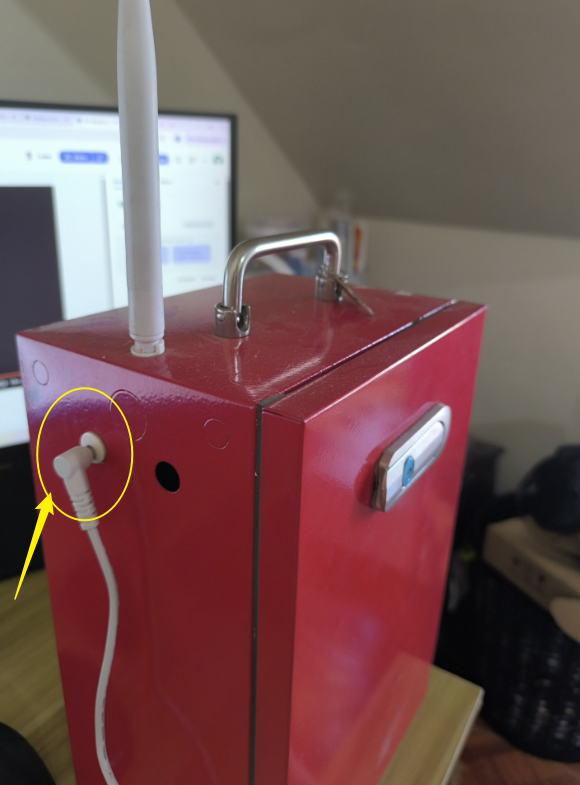
2. Plug the white power adapter into the CoinBox.
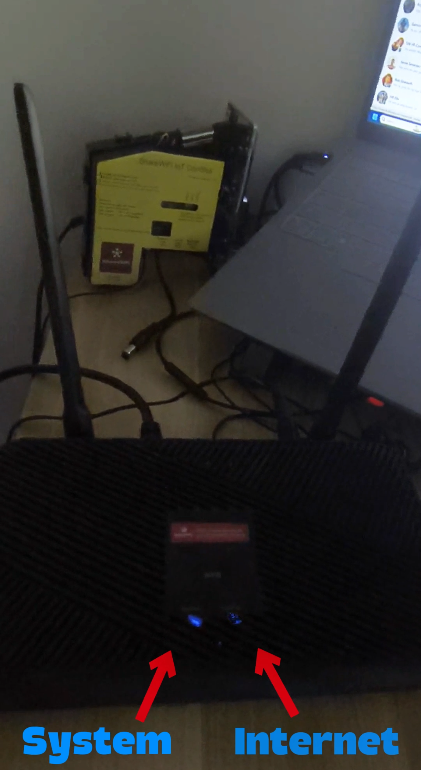
3. Wait for the billing router status light to turn blue.
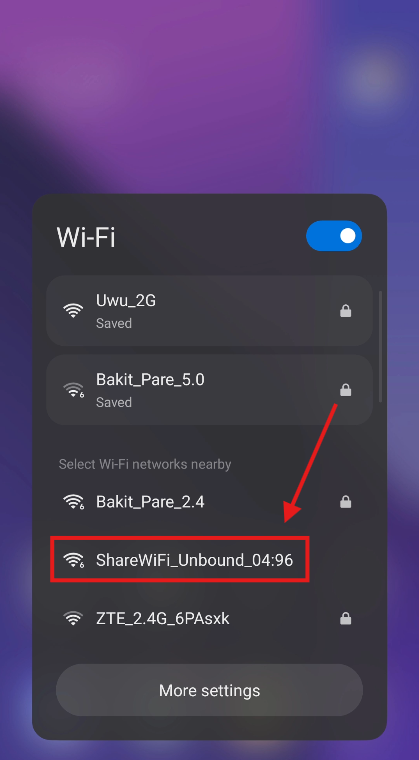
4. Once the billing router’s status light is blue, connect your device to its WiFi network (SSID). Look for the WiFi name that starts with “ShareWiFi.”
5. Open Google Chrome or any browser and go to 10.11.12.1. You should be able to access the Insert Coin Portal page.
6. Scroll down to the bottom of the Insert Coin Portal page and look for the Router ID.
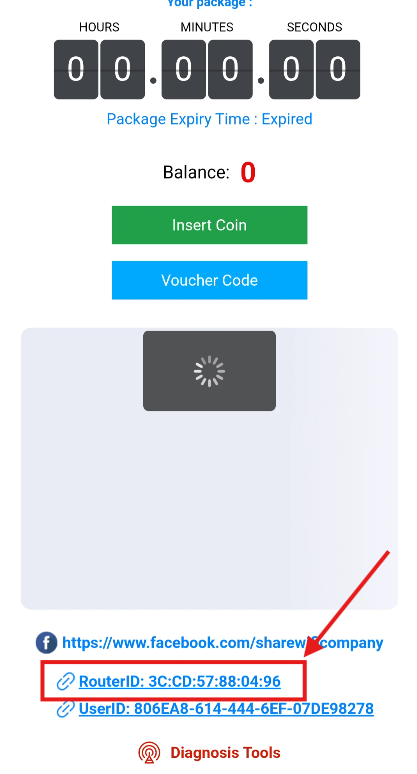
7. Tap the Router ID to copy it.
8. Reconnect your device to your personal WiFi network with internet access, then open the ShareWiFi App.
9. Log in to your ShareWiFi Portal account using the app. You can also use Google Chrome and access the ShareWiFi Portal through the link below:
Link: https://app.sharewifi.cc
10. Go to Router Management and tap the plus (+) icon.
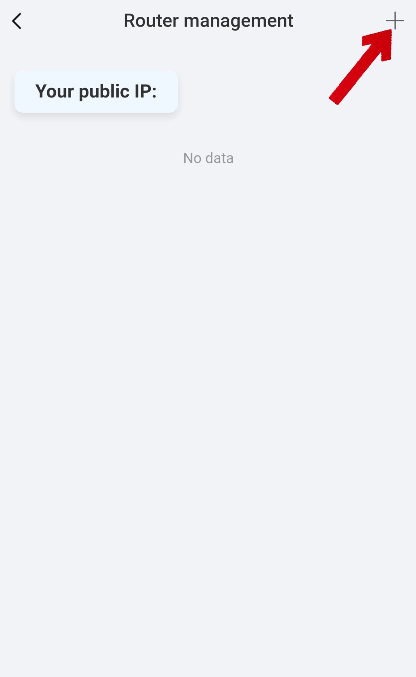
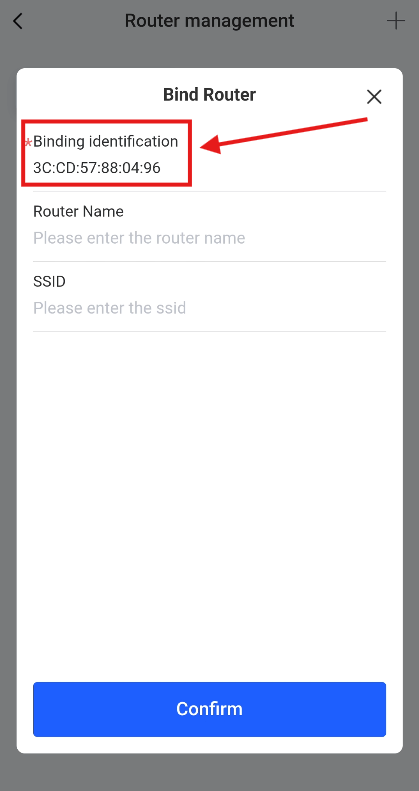
11. Paste the Router ID you copied earlier, then tap Confirm.
12. Once the router has been successfully bound to your account, go back to Router Management. Look for the Upgrade button highlighted in red and tap it.
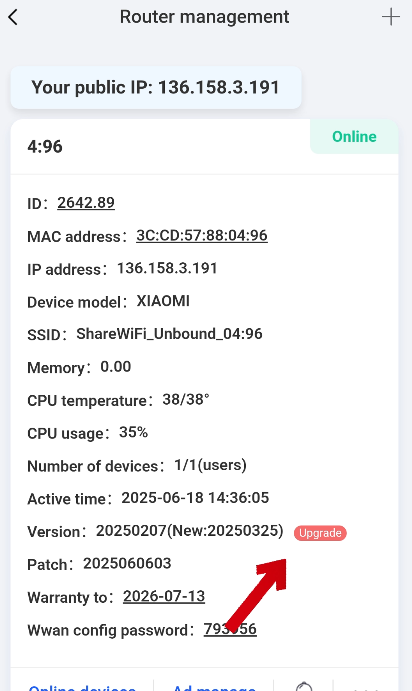
Wait for the firmware update to finish. The update should take approximately 5 minutes. Please do not turn off or unplug the router while the update is in progress.
How to Change WiFi Rates and Bind a Plan Package to Your ShareWiFi Router #
Follow this guide to change your WiFi rates and bind a Plan Package to your ShareWiFi Router.
How to Change WiFi Rates #
- Log in to your ShareWiFi Portal and go to Plan Management.
- You will see a list of your existing plans. You can also create a new plan by clicking the “+” icon.
- Find the plan you want to modify and click the pen/edit icon next to it.
- Change the WiFi rate according to your preference, then click Save after making your changes.
How to Bind a Plan Package to Your ShareWiFi Router #
- Log in to your ShareWiFi Portal and go to Router Management.
- Click the three dots (⋮) under your router.
- Select Bind Package.
- Choose the Plan Package you want to use.
- Once selected, the plan package will be bound to your ShareWiFi Router.
How to Generate Voucher Codes #
- Go to app.sharewifi.cc and log in to your ShareWiFi account.
- Go to Voucher Code.
- Under Generate Voucher, fill in the required details based on your preference:
- Amount: Select the voucher amount.
- Card Quantity: Enter the number of vouchers you want to generate.
- Email: Enter the email address where you want to receive the vouchers.
- Brand: Select or enter your preferred brand.
- After completing the details, click Send to Email.
- Check the email address you entered. If you don’t see the email in your inbox, please also check your Spam or Junk folder.
- You will receive the generated voucher codes in your email, ready to use or distribute to your customers.
If you have any other questions, concerns, or need assistance with your ShareWiFi setup, feel free to contact us anytime through our official WhatsApp Support Group:
👉 https://chat.whatsapp.com/BxtzPtVwlv87dsencAWgrT
Our ShareWiFi Support Team will be happy to assist you.
How to Activate and Use a ShareWiFi Scratch Voucher #
1. Go to the Voucher Section
After logging in to your ShareWiFi account, go to Voucher Code, then select Activate Scratch Voucher.
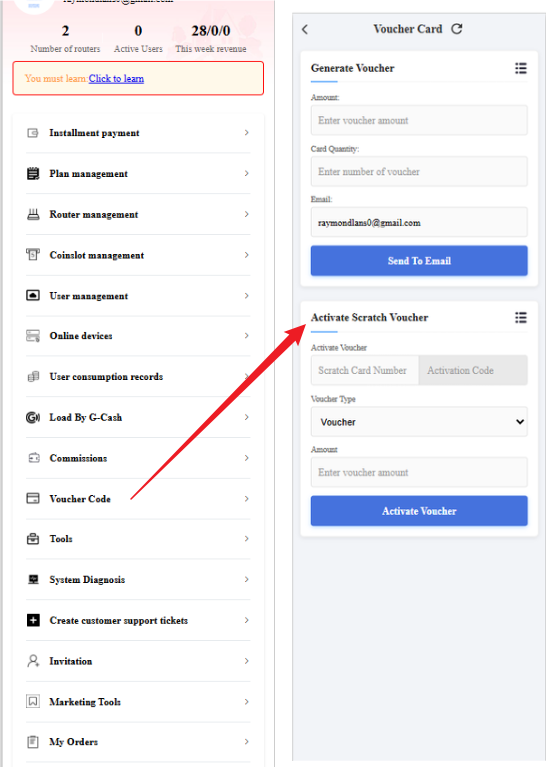
2. Prepare the Scratch Voucher Card #
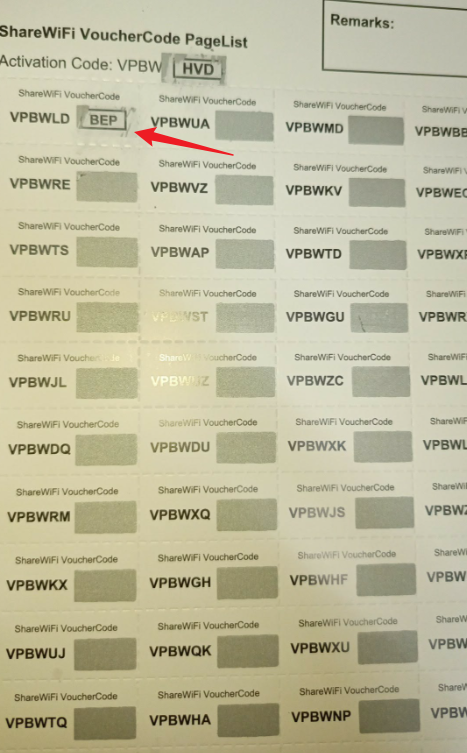
Get your ShareWiFi scratch voucher card and carefully scratch the covered area to reveal the Activation Code.
3. Enter the Voucher Details #
On the Activate Scratch Voucher page, enter the following information:
- Scratch Number (Example: UBAY)
- Activation Code (found on the scratch voucher card)
Make sure both codes are entered correctly before proceeding.
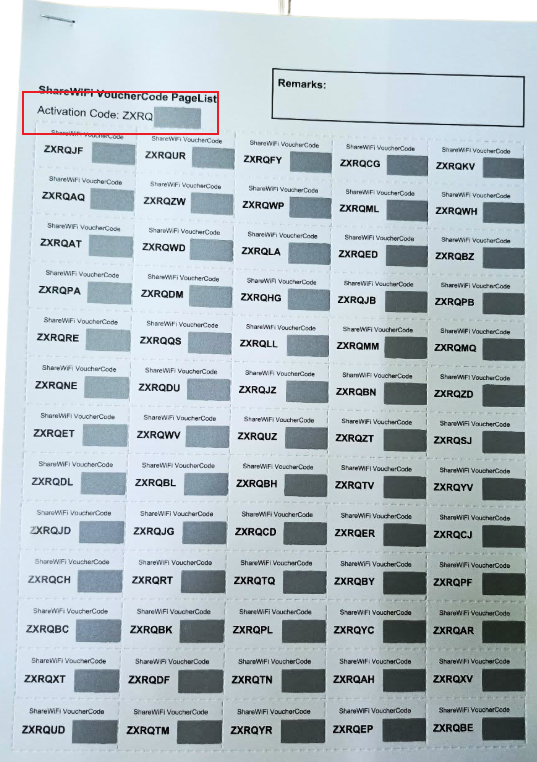
4. Select the Voucher Type
You can choose between two voucher types:
- Voucher Balance – The voucher value will be added to the user’s available balance.
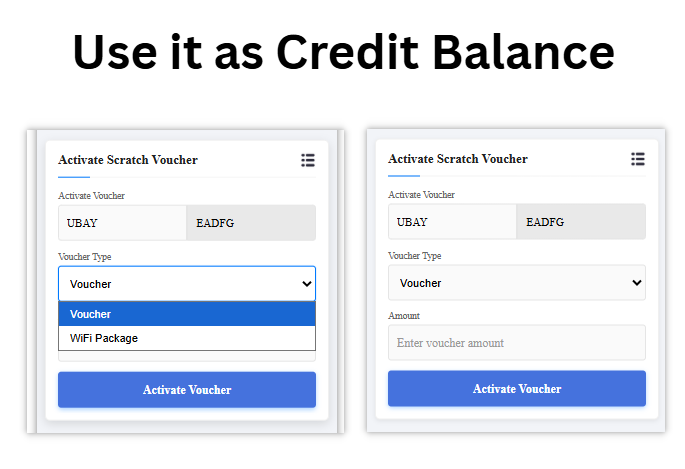
- WiFi Package – The selected internet package will automatically start once the voucher is successfully redeemed.
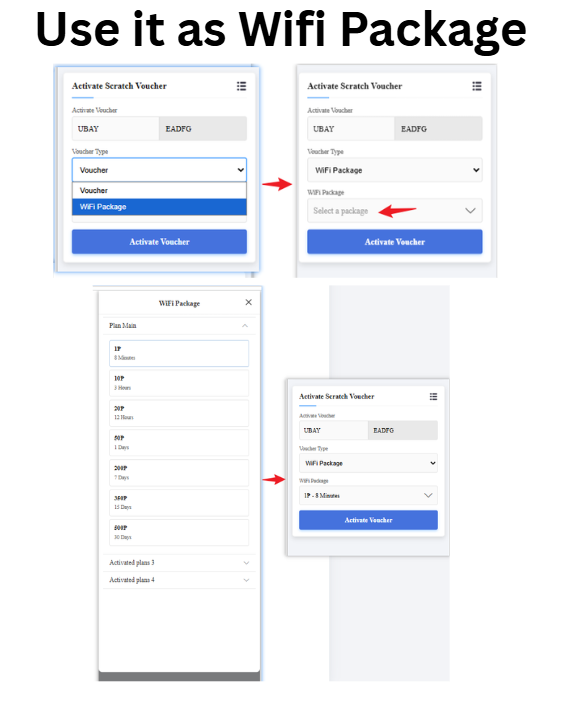
The available options will depend on the configuration of your Plan Management settings.
5. Set the Voucher Amount #
Under the Amount section, enter the value you want to assign to the voucher.
For example: ₱5, ₱10, ₱20, etc.
Note: You can set the voucher amount according to your preferred configuration in the ShareWiFi Admin Portal.
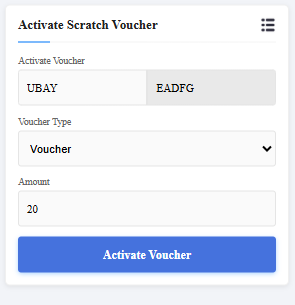
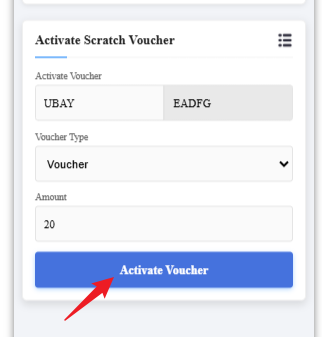
6. Activate the Voucher #
Click the Activate button.
Once successfully activated, you should see:
✅ “Coupon activated successfully”
Testing and Redeeming the Voucher (User Side) #
1. Connect to ShareWiFi
Using a mobile phone or other device, connect to the ShareWiFi network and open the WiFi portal.
2. Check the Current Balance
Check the user’s current available balance on the portal.
For example: ₱76
3. Enter the Voucher Code
Scratch the voucher card to reveal the required codes, then enter the following information in the Voucher Code section of the WiFi portal:
- Scratch Number
- Entry/Activation Code
4. Redeem the Voucher
Click Top Up to redeem the voucher.
Once successful, you should see:
✅ “Top up success”
The voucher value will then be added to the user’s balance.
Example: ₱76 → ₱101


